How to download .NET Framework for Windows 10 [Easy Way]
Free / Version 4.8
3 min. read
Updated on
Read our disclosure page to find out how can you help Windows Report sustain the editorial team Read more
Key notes
- If you're missing a previous version, our guide will help you install .NET Framework in Windows 10.
- Chances are, you already have the 3.5 version so you will only need to enable it.
- If not, you can always download it from the official Microsoft webpage.
- Try using the Windows installation media to get the missing and required software.
You may not know, but Windows 10 comes with .NET 4.8 Framework available, but most of the apps can also run with previous versions to run, so today we’re going to show you how to download .NET Framework for Windows 10.
The .NET 4.8 framework can be used to run applications built for the .NET Framework 4.0 through 4.7.2.
You probably have some applications on your PC that require a previous version of .NET Framework, and here’s how can you enable it on Windows 10.
How can I download .NET Framework 3.5 ?
- Enable Windows .NET framework from Control Panel
- Install .NET 3.5 Framework offline using Command Prompt
- Use the Windows installation media
1. Enable Windows .NET framework from Control Panel
- Press Windows Key + R to start the Run window and type appwiz.cpl, then press Enter.
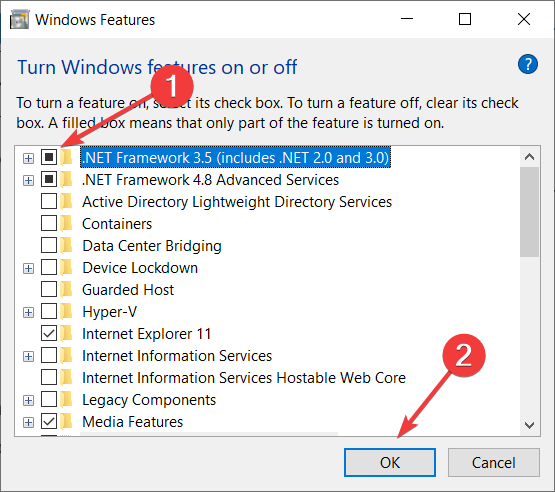
- When the Programs and Features window opens, you need to press Turn Windows features on or off and search for .NET.
- Click on .NET Framework 3.5 (includes .NET 2.0 and 3.0) on the list to enable it, then click OK.
- Follow the instructions to complete the installation, and if the installation requires restarting your computer, do so.
An additional way to install .NET 3.5 Framework is to install an app that requires .NET 3.5 Framework. If the app doesn’t detect .NET 3.5 Framework enabled, it will ask you to download the Framework.
In addition, you can download .NET 3.5 Framework on Windows 10 directly from Microsoft’s website.
If your Windows key doesn’t work, check out this useful guide to solve the issue quickly and get things back to normal.
2. Install .NET 3.5 Framework offline using Command Prompt
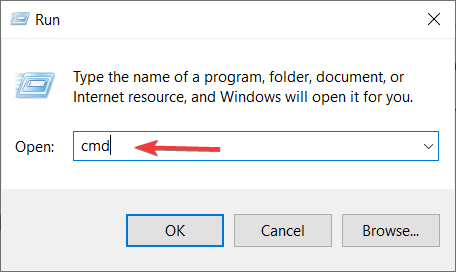
- Press Windows key + R to open the Run window.
- Type cmd and press Enter.
- Command Prompt window will open.
- Type the following command and press Enter (Remember to change F: to match your installation media for Windows 10. In most cases this is your DVD or USB drive used to install Windows 10, so make sure that your Windows 10 DVD or USB is connected to your PC):
Dism.exe /online /enable-feature /featurename:NetFX3 /source:F:sourcessxs /LimitAccess
If it seems that everything is lost when DISM fails on Windows, check out this quick guide and get rid of the worries.
3. Use the Windows installation media
If using Command Prompt seems too complicated for you, there’s no need to worry, there’s a simpler solution more suitable for new users.
All you need to do is to download this dedicated tool, connect your Windows 10 DVD or USB drive to your computer and follow the instructions.
This file does the same thing as the previous solution, but if the previous solution seems too complicated for you, feel free to try this one.
If you don’t have a Windows installation media, you can create one right now in just a couple of steps.
Installing .NET 3.5 framework on Windows 10 isn’t that hard, and we hope that these steps were helpful to you.
.NET framework 3.5 could be missing from your PC but you can get it with the solutions mentioned or by following this comprehensive guide to fix the .NET Framework.
For other suggestions or questions, feel free to leave them in the comments section below and we’ll be sure to check them out.


